


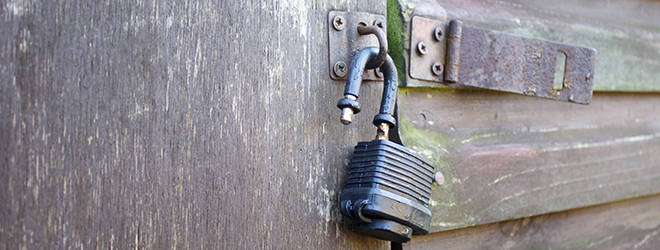
Our brand new shed is now fully upstanding, rising magnificently from the re-emerging nettle beds at the back of our allotment. Not only is it courting jealous glances from our allotment neighbours, its freshly felted roof is proving to be the ideal launchpad from which pigeons can launch their daring brassica raids on nearby plots.
We have, however, one final job to complete before we can hold an opening ceremony (after which we can start filling it with junk). We shall be installing guttering and a water butt – the advantages of this are twofold: to stop rain dripping off the roof and soaking the back of the shed, thus increasing the likelihood of premature rot; and to conserve precious rainwater with which to water our allotment veg. Having a handy water butt in situ will also save our poor old legs a walk to the nearest shared water trough. Admittedly, the closest water source to us is a 40 second round trip, but that’s 40 seconds extra weeding time in the bag, right?
The instructions below are for installing guttering on a pent shed… things get slightly more complicated (and expensive) if you’ve got an apex roof, where you’ll need to install guttering on three sides for maximum water channeling efficiency.
Parts you’ll need
For a 6×4, standard issue allotment shed, you’ll need to slide on down to your nearest hardware store and purchase the following items:
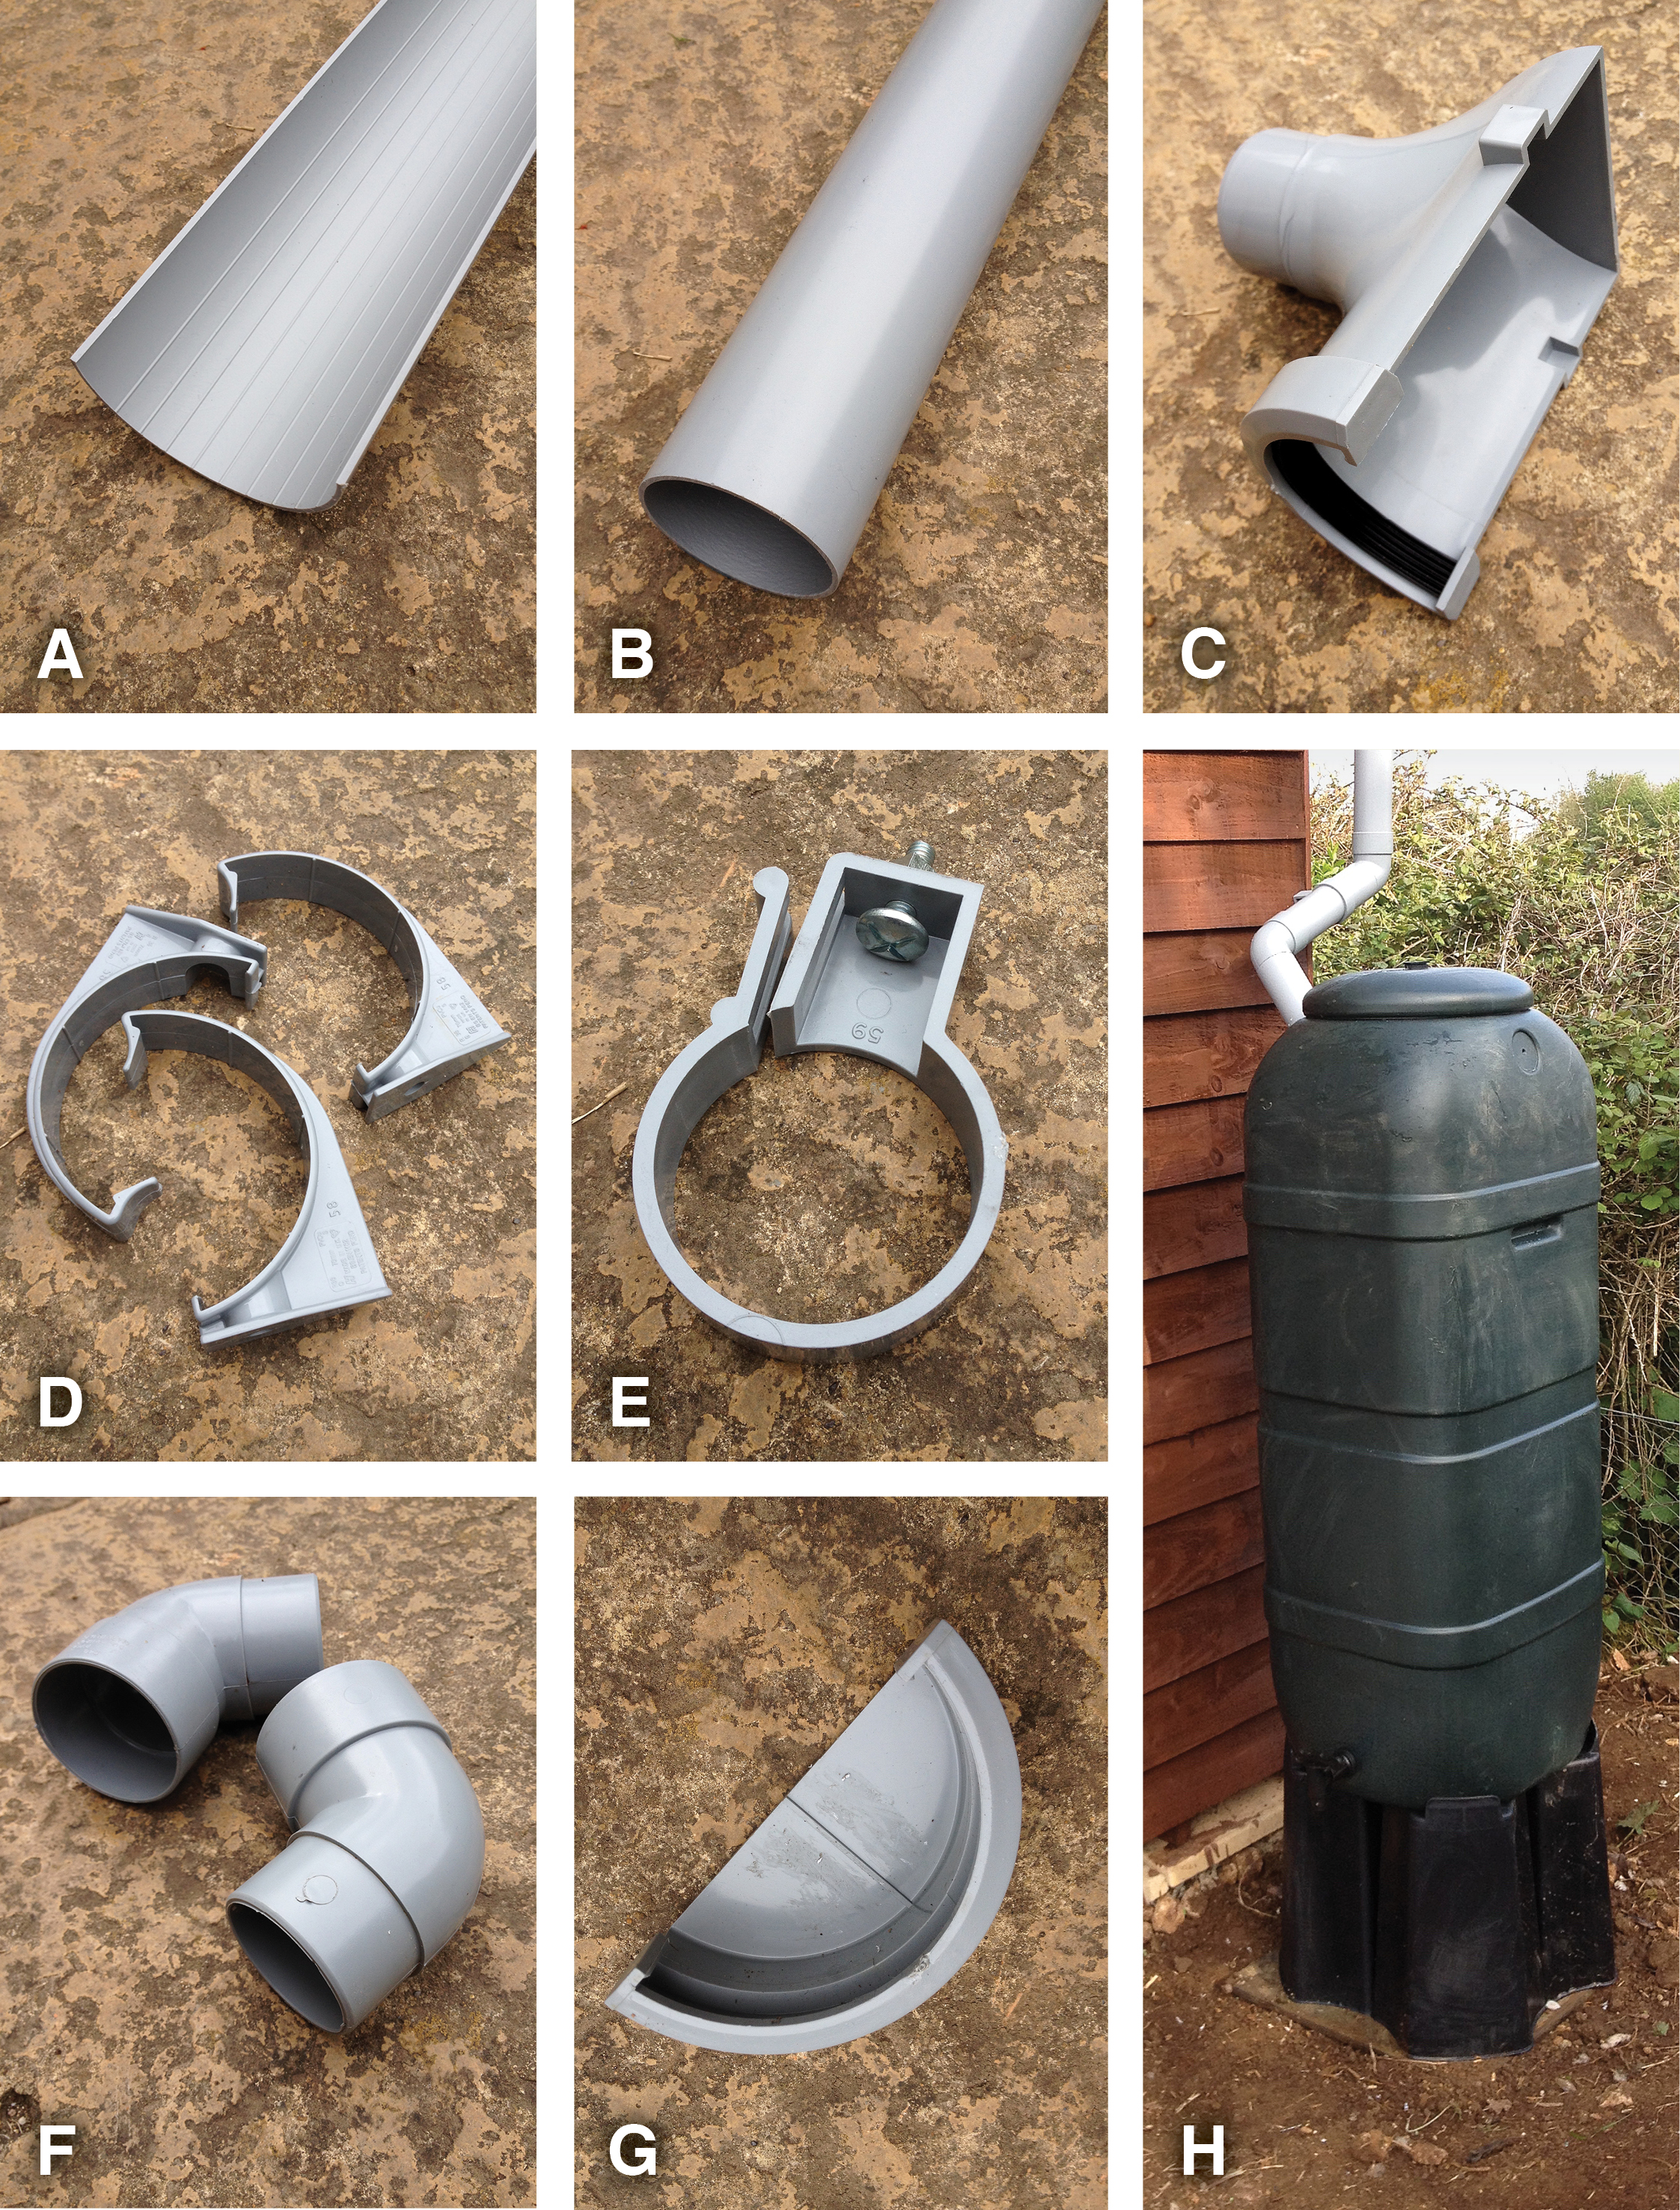
A) 1 x 6ft+ section of guttering
B) 1 x 6ft length of pipe
C) 1 x downpipe junction
D) 3 x fascia brackets
E) 1 x downpipe bracket
F) 2 x 112.5 degree offset bend joints
G) 1 x guttering end cap (not essential, but looks neater)
H) 1 x water butt
Pick your butt
We got our water butt from Aldi. He’s a handsome green chap – slim-line and stylish (at least as stylish as a water butt can be), with the capacity for 100 litres of finest rainwater. Ours came complete with base, tap assembly and a down-pipe diverter for those wishing to install directly to an existing drainpipe.
For allotment purposes, it’s best to pipe directly from the guttering to maximize rain-collecting efficiency, so to connect our guttering assembly onto our newly purchased butt, we enlisted a little help from ‘Uncle Stanley*’.
Get it straight
As any fule knows, water flows downhill, so the first thing you’ll need to find out is how level your shed is. A cock-eyed and crooked shed will determine the severity of which to angle your guttering, so whip out your spirit level and draw a straight line along the proposed guttering route.
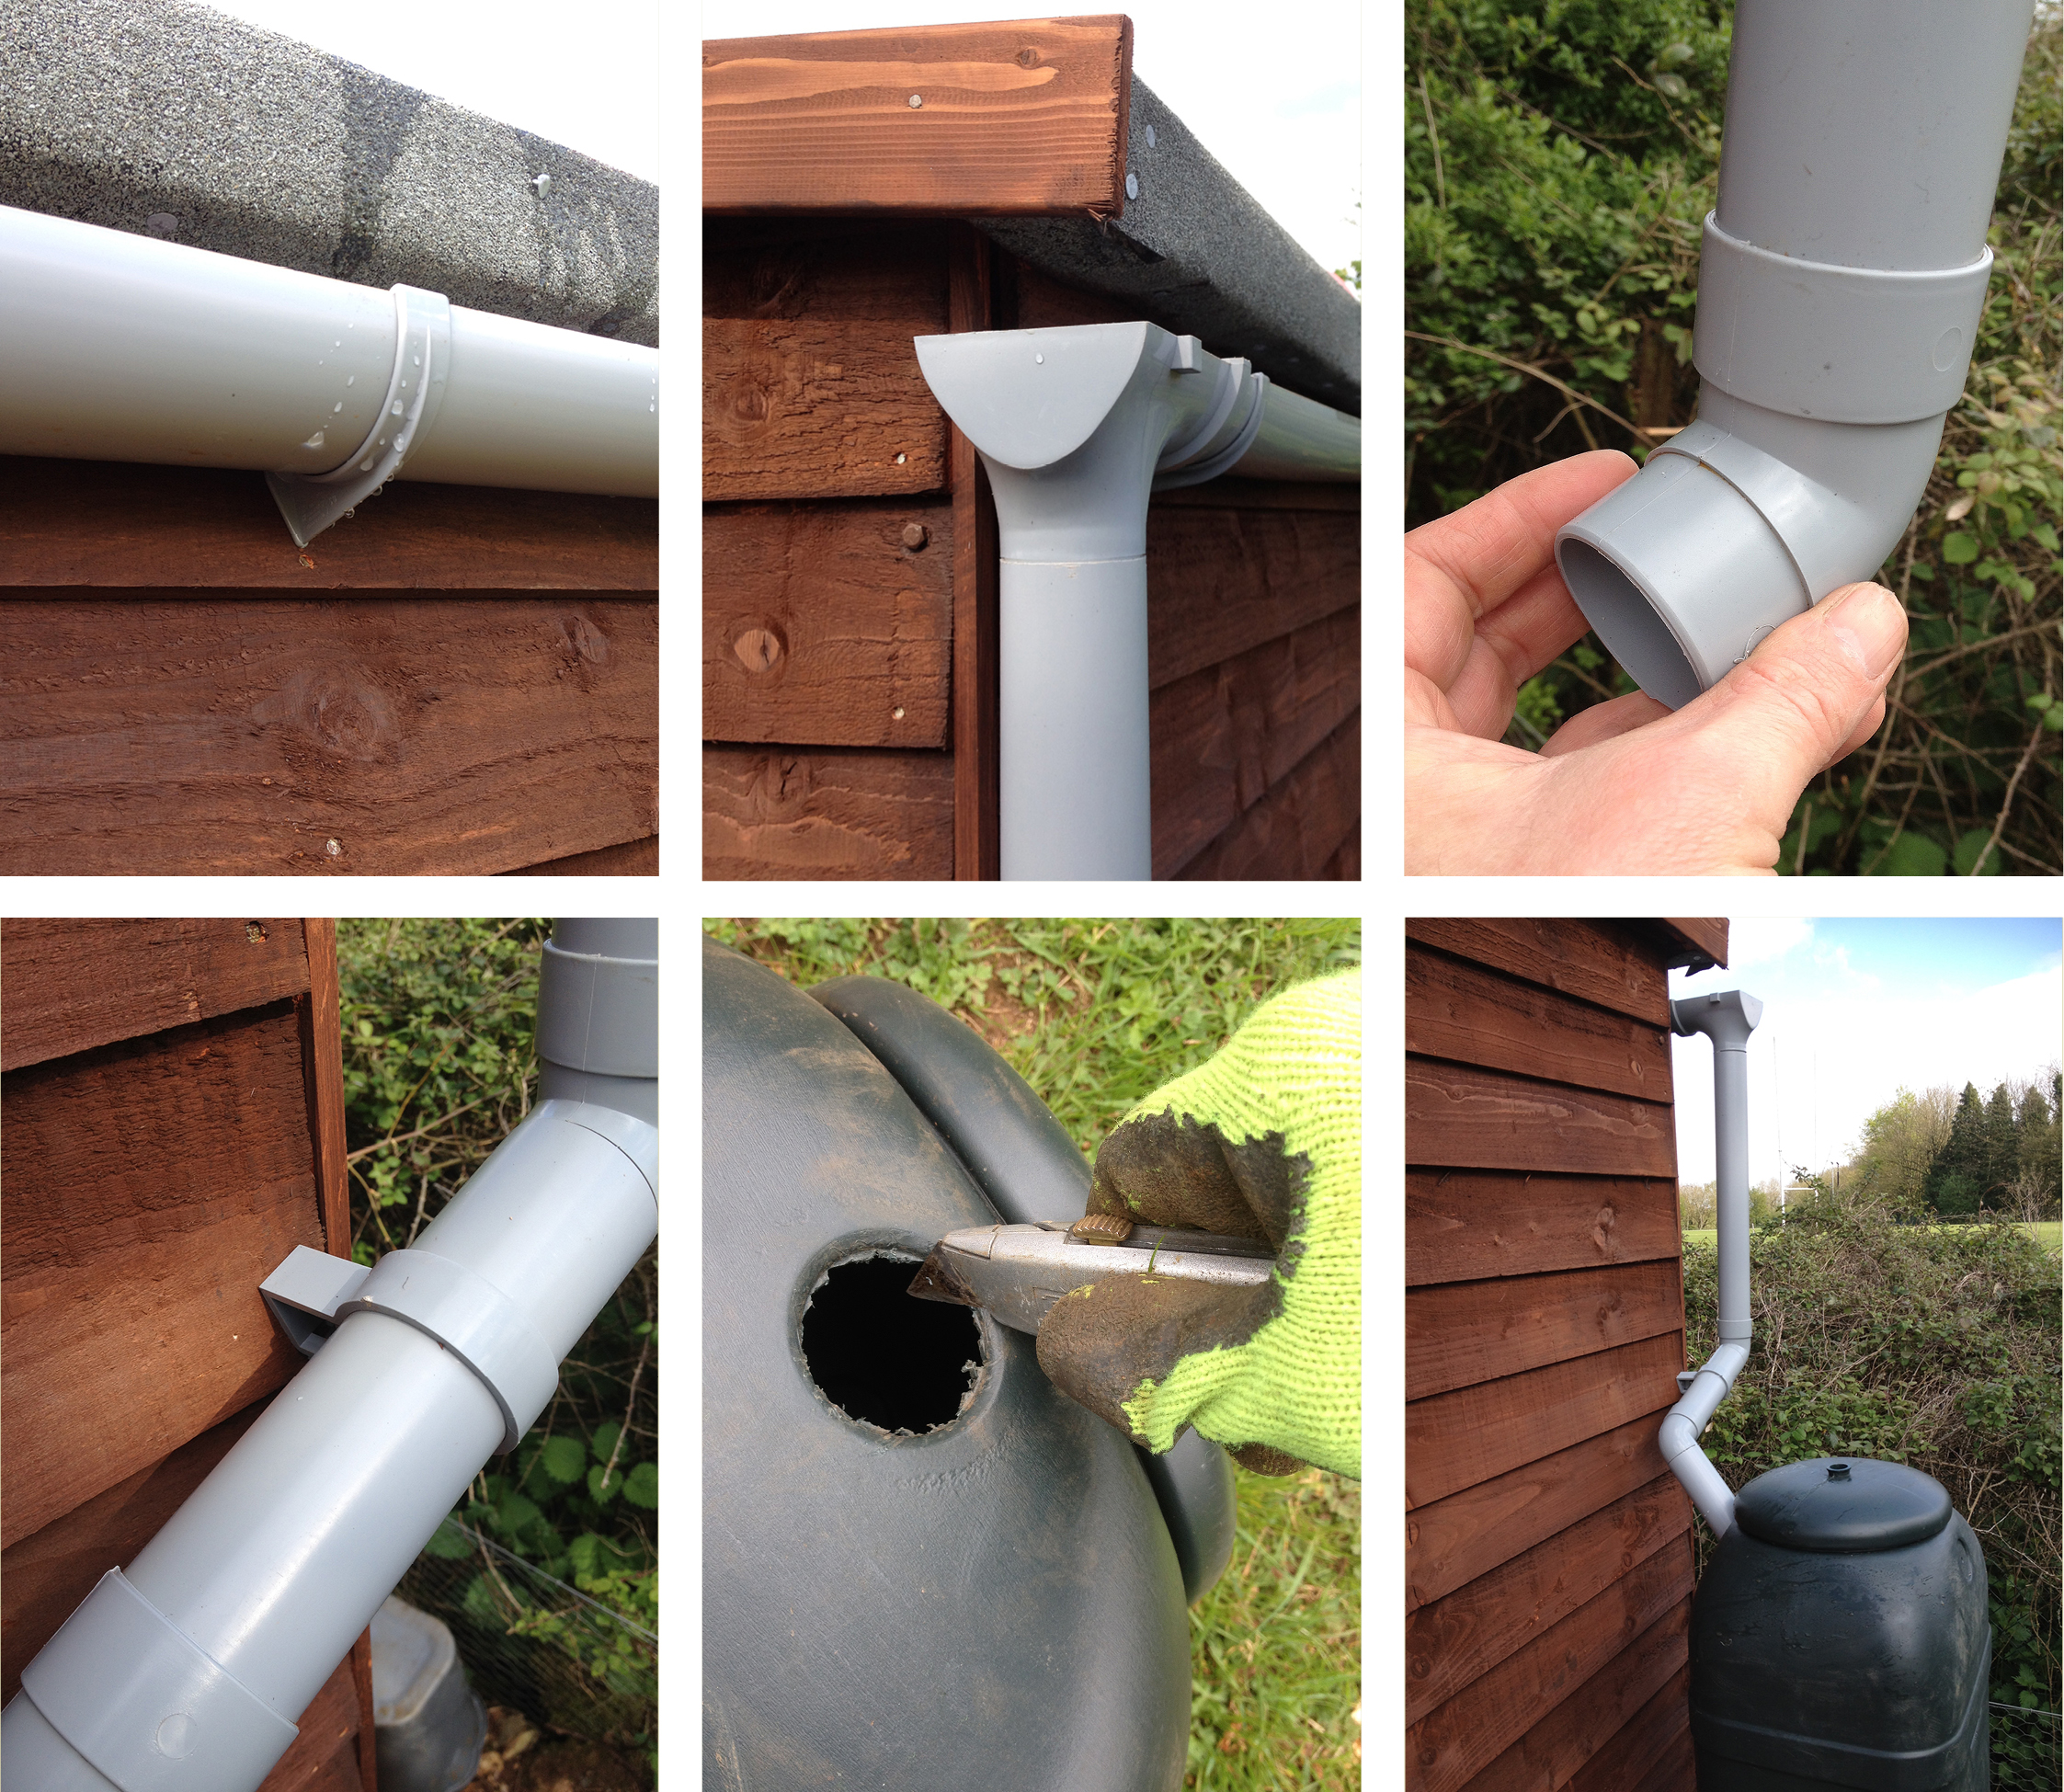
The thirteen steps to gutter heaven
Step 1: For a 6×4 shed, position one bracket in the middle, and the other two roughly 20cm from each end. Working from the end furthest to your water butt, ensure each bracket is positioned at least 5mm lower than the previous one.
Step 2: Click your guttering into place, making sure it’s seated properly in the fascia brackets.
Step 3: Affix the downpipe bracket to the gutter end nearest your butt. This might require a bit of force, so try and flex the guttering so in engages properly in the downpipe clips.
Step 4: At this point, you’ll want to make sure your water butt is in position so you can see how much to trim your pipes, so drag it over and mount it on the stand (or fashion a stand out of bricks if your water butt didn’t come equipped)
Step 5: Cut in half your 6ft pipe, then insert one half into the down-pipe junction, ensuring the down-pipe sits flush against the side of your shed.
Step 6: Taking into account the amount of piping needed to reach your butt, mark off the correct length with a pencil, remove the pipe and trim to size.
Step 7: Refit the pipe, then attach one of the offset bend joins.
Step 8: Take the other cut pipe length and attach it to the join you’ve just affixed.
Step 9: Measure, remove and trim as required.
Step 10: Push on the remaining bend join.
Step 11: Shove the pipe into the hole cut by ‘Uncle Stanley’ and attach this to your pipework.
Step 12: You’ll undoubtedly need to jiggle the pipes around a bit, to get them to seat properly. Remove, trim and reassemble if necessary.
Step 13: Finally, fix the mid section of your piping to the side of your shed with a pipe bracket to strengthen the construction, protecting it from strong winds and clumsy, rake-wielding gardeners.
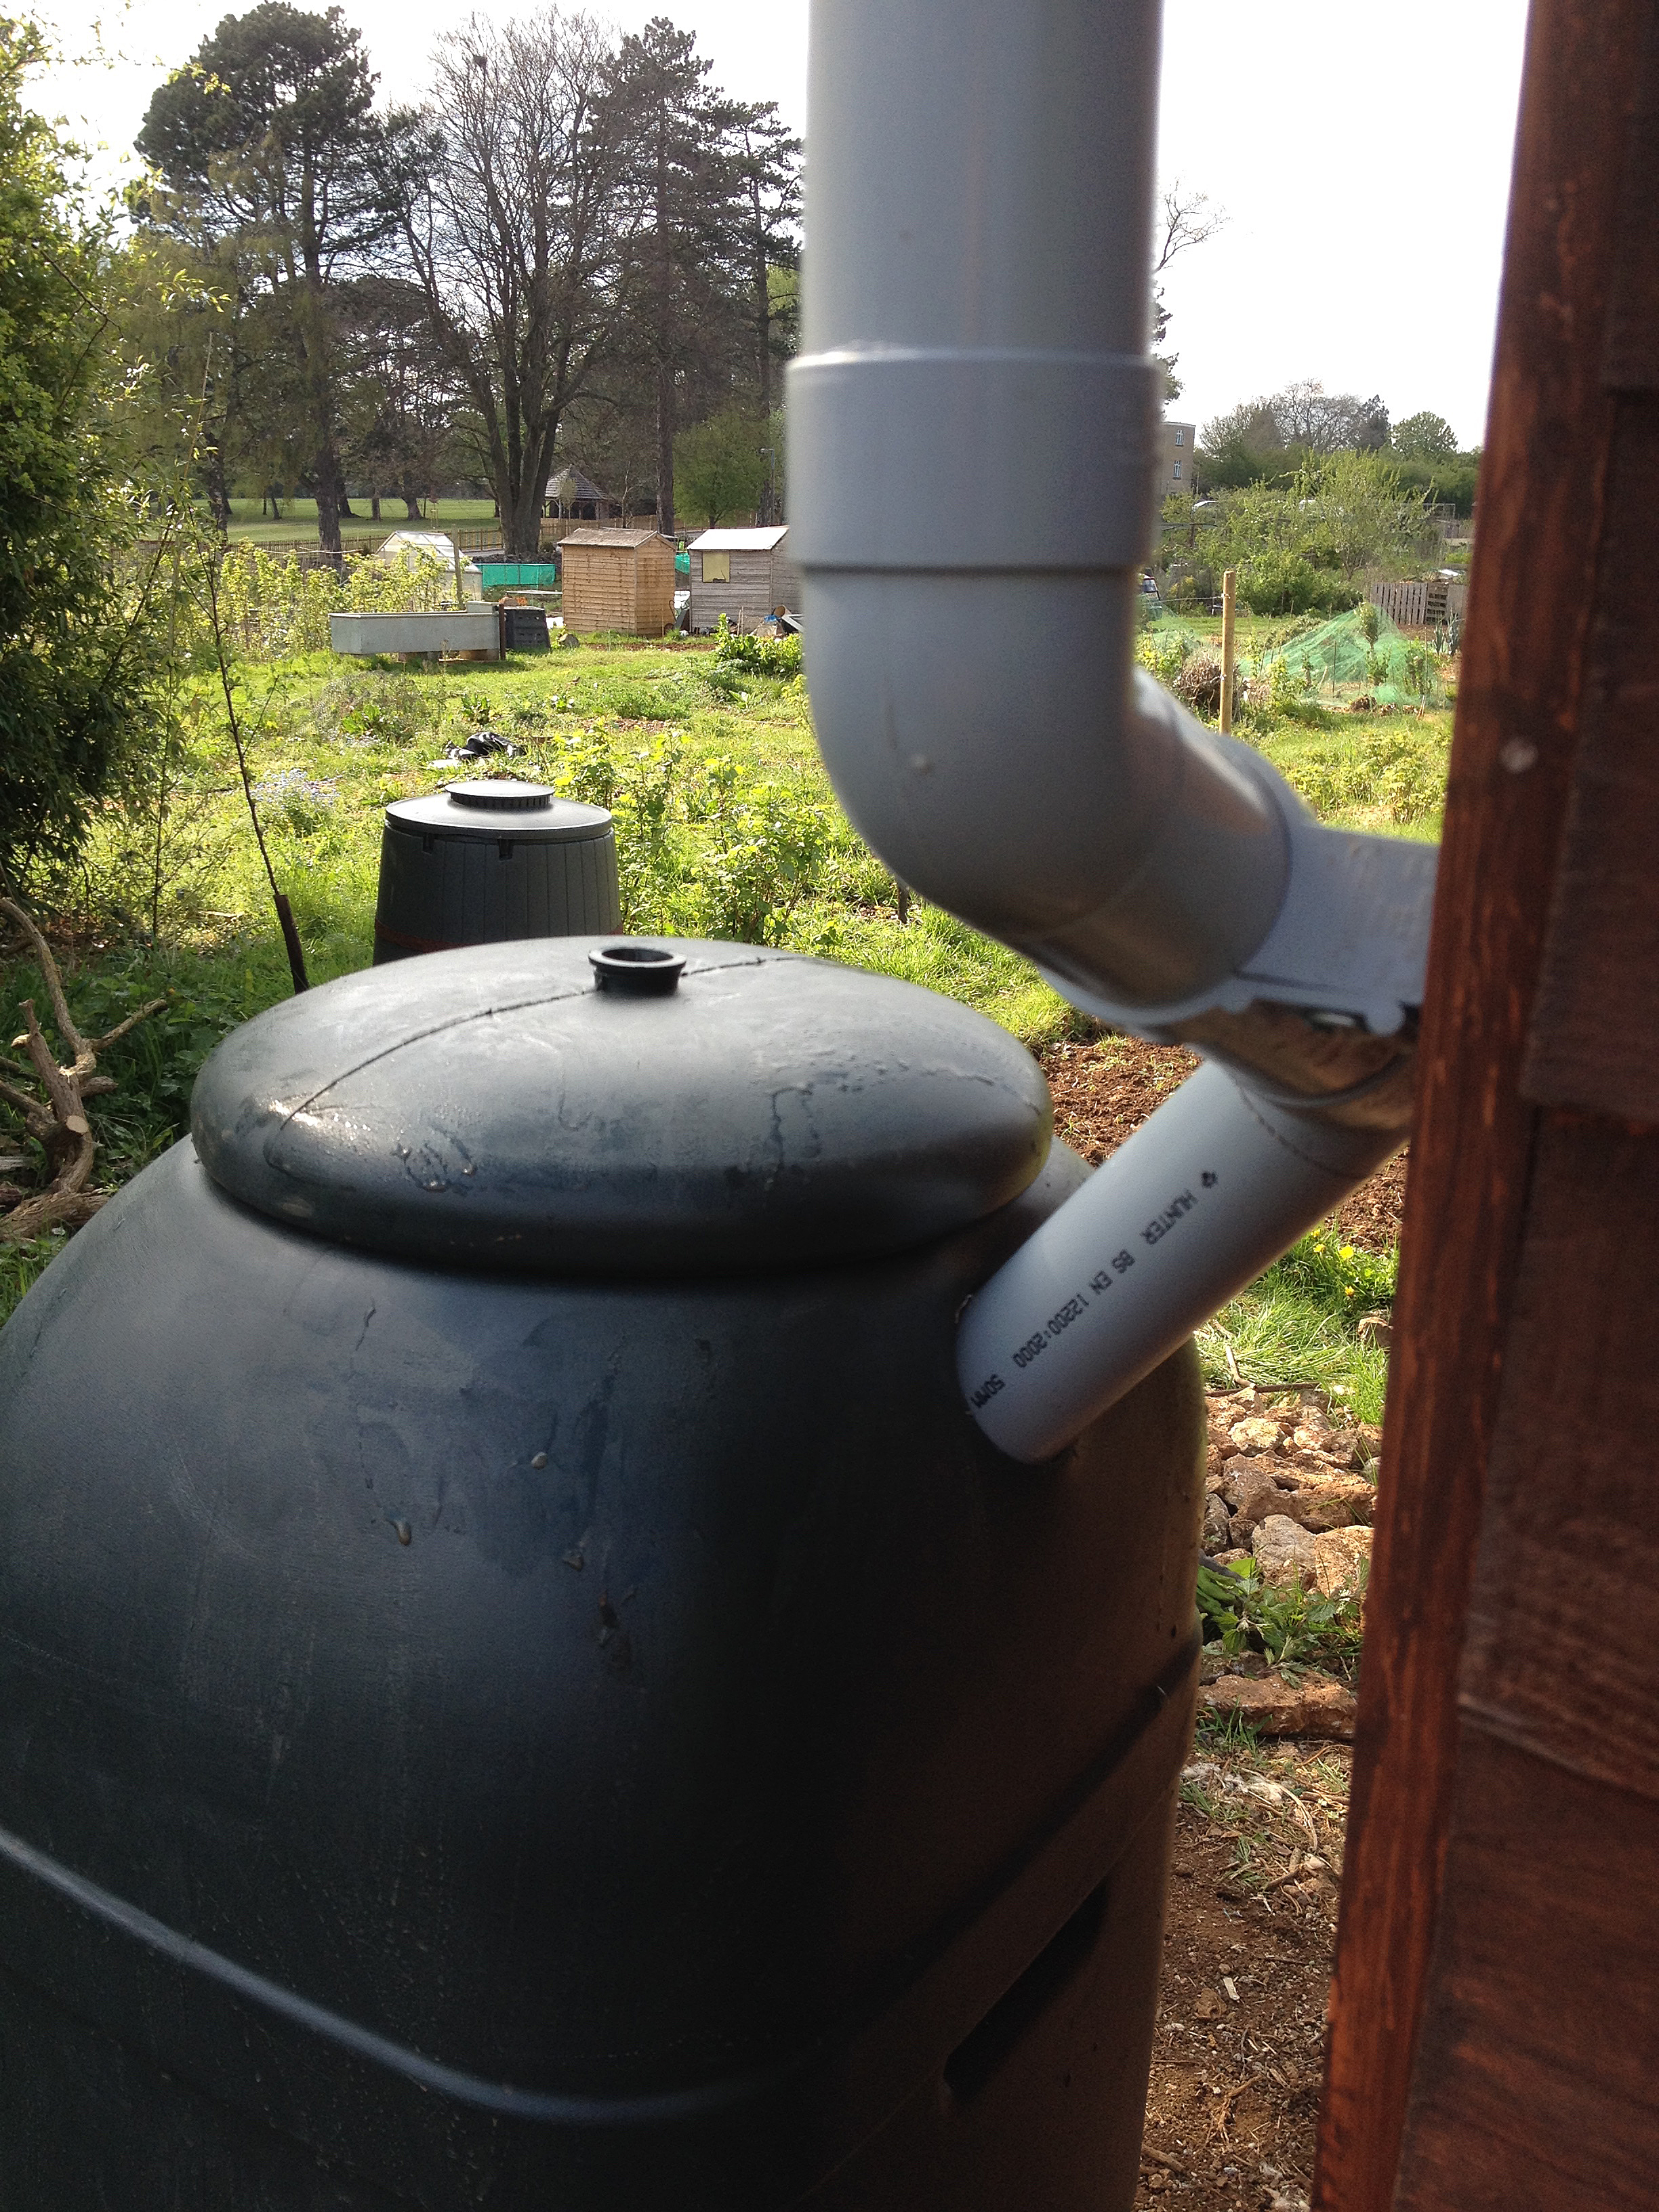
Gutteral stop
Ta-da! Now stand back and admire your plastic masterpiece. Give it a test by pouring water onto your shed roof.
If your pipes hold true and your butt starts to fill – success! If you’re now standing in wet jeans, go back to step 1 and PAY ATTENTION.
The butt stops here
Before leaving your butt, fill it up with a few buckets of water. This will stop it blowing away should the weather turn gusty, and save you from being the laughing stock of the allotment as your empty butt tumbles across the plot like a horticultural katamari.
*Uncle Stanley the Stanley knife
Note: the butt was sent to us by Aldi for review. It’s a good ‘un

[…] can be damaged too eventually leading to corrosion and degradation. For those looking to install a shed guttering system, it is relatively […]
Cracking tutorial. Anticipating delivery of my shiny new shed in a couple of weeks’ time, so plotting and planning for a double-butt set-up. Oooer-missus.
Thanks also for the tip re the 5mm drop per bracket – obvious, but wouldn’t have thought of it!
Glad it’s helpful! Send us pics of your butt setup when finished, and we’ll post them online. Might even start a new regular section – ‘Show us your butt’.
What do you do when butt fills up.just drain some off.
Hi Phil.
Yes, you can if you like. Or just leave it and any excess will just overflow out the top of the butt. No need to worry.
Cheers
Rich
How do you stop the guttering – even on a slope – acting like a dam when rain fall heaven and the water up – travelling and soaking up under the ashfelt into the shed roof. – have had guttering along the backside of my shed for quite a few years and that’s what it’s done – not all along – but in a foot strip half way along the length of the shed – how far below the roof edge should the guttering go and how big a gage should it be. – ? Mine is on a slope – but do wonder if it would be better off to take it off – don’t use butt any longer. – as there is no lack of rain in London
Hi Lucy. You could try increasing the angle of the guttering to shift the water quicker. The dam effect shouldn’t really happen though, unless you’ve got a blockage somewhere. It might be worth checking the joints to see if there are any places where leaves etc. can gather that might be causing the problem. You could indeed remove the guttering, but you’ll run the risk of water running off the roof and then blown by the wind onto your shed walls. And no-one wants soggy shed walls.
Cheers!
Rich
This is a great tutorial and I had managed to fit one during the weekend (took just under one hour). The roof edge is 160mm from the shed wall so the standard 112mm gutter won’t catch water if directly mounted on the wall. So I had cut up a small wooden block (50mm x 50mm x 30mm) and mount the bracket on top. So the gutter is right under the roof edge. See below the picture.
https://goo.gl/photos/nEC8D3LX6nKaqwSK8
Another point is the roof is 2.4m plus 10cm on each side, so making 2.6m. As the standard size of gutter is 2m or 4m, so I had just opt for 2m rather than get 4m one to cut down or get 2 x 2m and use the connector. Just 2m is sufficient to fill up the 100l butt efficiently.
Thank you for the post, it is very helpful indeed.
Thanks for the kind words Tony, glad it was useful!
Cheers
Rich
I am about to give this a go myself with zero experience in anything handy. Thanks already for listing things/parts with pictures and the steps to do. Bit nervous but this is a quality article already. I currently have 9 plastic storage boxes catching rain :-/. Thanks already.
Good luck, Trys. Hope it all goes to plan. Send us your pics, either way!
cheers
Rich
Hi,
Found this extremely useful, thank you! Just ordered my parts from Screwfix, saving a fortune on the basic guttering offered by the shed maker.
One question – how do you stop the water butt from overflowing? Or is it case of just keeping an eye on it? I was thinking of installing a rain diverter to the downpipe and lead the main downpipe into a border.
Hi Taz, glad the guide was of use. To be honest I just let my water butt overflow, but adding a rain diverter is a great idea! Send us pics when it’s up and running.
Cheers! Rich
Really helpful guide especially on what bits to buy, I’ll be putting my guttering up later this weekend, weather permitting.
Thanks Aniela, let us know how you get on!
Rich
Great tutorial Rich, thourougly enjoyed reading it. I’ve subscribed to your feed. I’ll be testing out your old fashioned recepe soon also 🙂 Cheers
Thanks Jack. Guttering first, then Old Fashioned. We don’t want wonky pipes, do we?
Cheers!
Rich
Great tutorial Rich, our guttering needs to be replaced (actually so does the whole shed roof to be fair) so i’ve been looking for proper shed guttering installation techniques!
We have a very constrained area for water-butts, and have a small slimline one in place between the shed and wall (difficult to explain without a photo!).
Are there any techniques for cascading water into a second butt in the case of overfilling?
Thanks again
Hi there. I’d bore a hole just below the fill level of your existing butt, bore a similar hole in the second butt – making sure it’s 10-20cm lower – then connect the two with a flexible pipe.
That should do the trick.
Cheers!
Rich
The water in my watering can, from the butt, is foamy. Is the water toxic if it comes off bitumen roof felt?
Hi Elizabeth. If you have an old water butt, it might be down to the leaves and mould in the bottom fermenting slightly which can lead to a foam. Try cleaning the butt out and see if that helps.
Unless your shed is really old (asbestos was once used in the manufacturing of bitumen roofs), I wouldn’t be too concerned. I’m not going to be drinking (or brewing) with the water from my butt anytime soon, but it’ll be fine for watering the garden.
Best wishes
Rich
Thank you for such a detailed step by step set of instructions. I’ve got the butt and the greenhouse so wasn’t sure how what I needed or how to fix it. I’ve not tried as yet, but feel much more confident giving it a go
Hi I have had a new shed installed but forgot all about the guttering unfortunately I now cannot get behind the shed to put it up have you any suggestions how I can do this without moving the shed .margaret
Hi Margaret. It’s tricky to say without seeing the shed. Any chance you could send over a picture? Best wishes Rich
Great tutorial but I would suggest that the rain draining off of the roof, with your type of asphalt roof edge, will curl under the eave and much of the rain will run down the wall of the shed while most might drip into the gutter. Flashing along the upper wall overlapping into the gutter would remedy this. Otherwise …it is early rot for the new shed.
Hey Sue, adding flashing is a very good suggestion! My shed has quite a steep pitch so the rainwater runs straight into the guttering. Flashing would be a good solution for sheds situated in exposed positions where the wind may blow dripping rainwater onto the walls, and as you suggest, sheds that suffer from water curling under the eaves.
Keep on shedding…
Rich
I live in American and there doesn’t seem to be this type of gutter system. Only full size gutter systems for homes. I’d much prefer to use this type on my shed since it’s smaller and much easier to install. Plus looks nicer. Do you have a brand or manufacture of the gutter system?
Good question! I’ve just had a look and could only find full-sized, square systems available in the USA. Might be worth trying Ebay? If you find a solution, let us know!
Best wishes
Rich
Great tutorial, a lot of people don’t think of the potential of installing shed guttering. Just wondering since you mentioned you got your water butt from aldi, would I have to wait until summer to get my hands on one again, as i sounds like a seasonal item?
Hi James.
Yes, the Aldi butt is a seasonal item. Keep your eyes peeled in spring.
Cheers
Rich
Fab tutorial! I had managed as far as knowing I needed a down pipe but couldn’t figure out the water diverter the butt came with, different sizes of piping etc. Your idea using the extra down pipe is great, and the Stanley knife. I was wondering how to “drill” 25mm. Will be up and going in no time. Plenty of rain in Ireland.
Thanks Ruth! Careful with that Stanley knife…
Rich that’s a cracking idea thanks for sharing, irrespective of the obvious benefits, it comes with the added bonus for some people (like myself) that the shed is at the bottom of the garden and saves the walk back and forth to the outdoor tap.
I will give this a go when I don’t have a million other things to do.
Thanks for posting the instructions, very straight-forward and easy
to follow.
(I am in the UK.)
What size screws did you use for the gutter brackets. My pent shed doesn’t have a facia so the brackets will fit directly to the shed sides. As there’s not much thickness too the wood, screws would go right though.
I’m about to take delivery of a new work shop and will gutter it . As part of the costing exercise I noticed there is a clip on version made by a company who’s name looks like woeflast (close enuf I think but I’m not sponsored by em) but the clip on looks like it cud be retro fitted from above if the shed owner can’t access the rear low end of the shed. Just out of interest u know u can have a reverse pent roof where the low end is over the door?
Hi Brian, I’ve never seen a pent shed with a door on the lower end. I’m guessing it would make the structure pretty tall? Unless of course you had a small, hobbit-sized door. I hope your workshop guttering project goes well.
Cheers!
Rich
What size screws did you use for the gutter brackets. My pent shed doesn’t have a facia so the brackets will fit directly to the shed sides. As there’s not much thickness too the wood, screws would go right though.